Purpose and Utility
In CAD drawings, working with multiple georeferenced image tiles — especially after using tools like Download Web Map Tiles — can quickly overload your file, increase size, and slow down performance. That’s where mosaicking becomes essential.
The Mosaic Images tool helps you merge multiple image tiles into a single raster. This process not only reduces clutter but also improves the manageability and portability of your DWG. It’s the recommended next step after importing tiles — a cleaner, safer option that ensures your drawing remains optimized and organized.
Technical Description
- Input Requirement: One or more georeferenced raster images (e.g., .png with associated .pgw files) must already be present in the drawing.
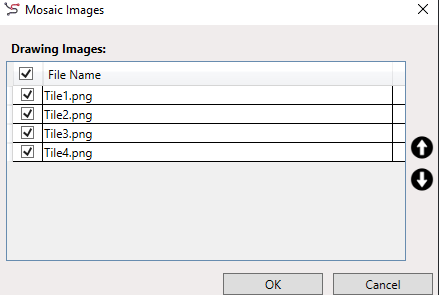
- Image Selection:
- You can select all images at once or choose selectively which ones to mosaic.
- Images are listed with filenames — users can pick and arrange them as needed.
- Ordering Control:
- The stacking order of images in the mosaic matters (especially if some tiles overlap).
- Use Move Up and Move Down buttons to change the order.
- First, select an image in the list, then press the movement buttons.
- Output Folder:
- After confirming the order, the user is prompted to specify an output folder where the mosaic image will be saved.
- SPCAD then begins the mosaicking process.
- Process Handling:
- The tool merges the selected images into a single raster image, ensuring georeferencing is preserved.
- Heavier images may take longer to process.
- The user can cancel the operation at any point before completion.
- Post-Mosaic Cleanup:
- After successful mosaicking, you can detach the individual image tiles from the drawing to reduce load.
Workflow
- Go to Coordinate System → GeoTools → Mosaic Images, or type MOSAIC_SP
- Ensure required tiles are already loaded in the drawing (e.g., from Download Web Map Tiles)

- Select images you wish to include:
- Choose all, or be selective
- Use Move Up / Move Down to define image order
- Click OK once image list and order are finalized
- Specify the output folder where the final mosaicked image will be saved
- Wait for processing — time depends on image sizes

- Detach old tiles if needed to keep your drawing lightweight

Tips & Notes
- Why Mosaicking Helps:
- Keeps your DWG file clean and less cluttered
- Makes image management simpler (only one image to track)
- Prevents accidental shifting or deletion of individual tiles
- You can run this tool multiple times if your images are from different areas or resolutions
- Combine with Cartographic Grid for layout preparation